Nomad 3 · Volume 3
Nomad 3 — Software and Workflow
3.1 From idea to chips: the shape of the workflow
A CNC mill does nothing until it is told, in exhaustive detail, where to move the cutter and how fast. Getting from an idea to those instructions is a three-stage pipeline that is the same on every mill, and worth naming clearly because each stage is a different piece of software doing a different job:
- CAD — computer-aided design — is where the part’s geometry is drawn: the shapes, holes, and pockets.
- CAM — computer-aided manufacturing — takes that geometry and decides how to cut it: which tools, in what order, along what paths, at what depths, feeds, and speeds. Its output is G-code, the plain-text list of coordinated moves the machine actually executes.
- The sender streams that G-code to the machine, and provides the controls to jog the axes, run the probes, set the zero, and start, pause, and stop the job.
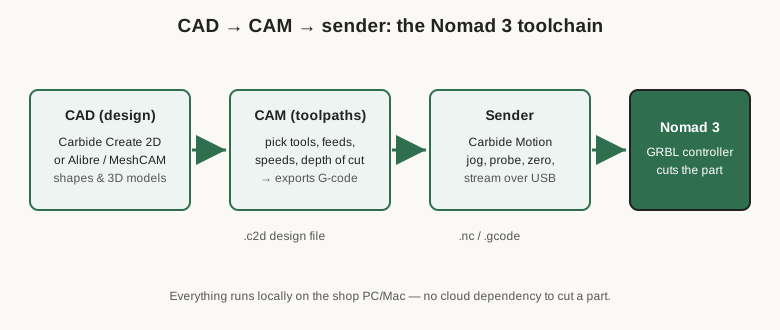
The Nomad’s appeal is that Carbide supplies a coherent, locally installed set of tools for all three stages, so a new owner is not left assembling a workflow from mismatched free software. Nothing here depends on a cloud login to cut a part — the design, the CAM, and the sender all run on the shop’s own PC or Mac.
That local-first design is worth appreciating, because a surprising number of hobby CNC ecosystems have drifted toward cloud CAM that stops working when a subscription lapses or an internet connection drops. The Nomad’s toolchain is the opposite: install it once, and the machine keeps cutting whether or not the shop is online, whether or not any account is active, for as long as the computer runs. For a tool that is meant to be a dependable part of the bench for years, that independence matters more than any single feature. The underlying motion firmware is a GRBL-family controller — the same open, well-understood firmware that runs a large fraction of the hobby CNC world — which means the community knowledge about G-code, feed overrides, and troubleshooting largely transfers, and the machine is not a sealed black box.
3.2 Carbide Create: CAD and CAM in one
Carbide Create is Carbide 3D’s own 2D design-and-toolpath program, and for the majority of desktop-mill parts it is the only software the workflow needs. It combines the CAD and CAM stages in one window: draw the part on the left, assign toolpaths on the right, export G-code. “2D” here is a slight understatement — it works in what machinists call 2.5D, meaning flat shapes cut to specified depths, which covers an enormous fraction of real parts: pockets, profiles cut to a depth, drilled holes, engraving, and slots.
The CAD side offers the expected vector tools — rectangles, circles, polygons, arbitrary curves, text, plus offsetting, booleans, and precise numeric entry so a hole really is exactly 6.35 mm where it should be. It also imports SVG and DXF files, so a part drawn in another CAD package, or a logo drawn in a vector editor, drops straight in.
The CAM side is where Carbide Create earns its keep for a beginner. The operator selects geometry and assigns a toolpath type — contour (cut along or around an edge, for profiling a part out of stock), pocket (clear all the material inside a boundary), drill, engrave, or a V-carve for beveled lettering. For each, they pick a tool from the library and set the cutting depth and how much to take per pass. Crucially, choosing a tool auto-populates a starting feed and speed, which removes the single most intimidating decision for a newcomer.
For genuine 3D work — sculpted reliefs, curved jewelry, organic surfaces — the bundled MeshCAM takes a 3D model (an STL, for example) and generates the roughing and finishing toolpaths a flat program cannot. And for PCBs, Carbide bundles Carbide Copper, which ingests standard Gerber and Excellon fabrication files and produces the isolation-milling and drilling toolpaths to cut a board from a copper-clad blank. On Windows the package also includes an Alibre Workshop parametric CAD license for those who want full solid modeling upstream of Create.
Two details of the CAM stage deserve calling out because they trip up newcomers. The first is tabs (also called bridges): when a contour toolpath cuts a part free from the surrounding stock, the part can shift or fly loose on the final pass. Tabs are small uncut bridges the CAM leaves connecting the part to the waste, holding it in place until the operator snaps or files it free afterward — a small setting that prevents a ruined part on the very last cut. The second is cut direction and stepover: climb versus conventional milling, and how much of the tool’s width engages the material on each pass. On a light machine, keeping the stepover modest and letting the toolpath take many light passes is far kinder to the tool and the finish than trying to take a full-width bite. Modern CAM offers adaptive or high-efficiency pocketing that keeps the tool’s engagement constant and light while moving quickly, which is close to ideal for a machine like the Nomad and worth using wherever the software offers it.
It is also worth previewing the toolpath before cutting. Carbide Create and MeshCAM both show a simulation of what the tool will do, and a few seconds spent watching that simulation catches the expensive mistakes — a plunge in the wrong place, a rapid move that would crash into a clamp, a depth that goes clean through the wasteboard — before they become broken tools or scrapped stock.
3.3 Tool libraries: the machine’s memory of its cutters
A tool library is the database of cutters the CAM software knows about — for each tool, its diameter, number of flutes, type, and the default feeds and speeds to run it in a given material. This is not busywork; it is where a shop’s hard-won knowledge lives. Carbide Create ships with libraries for Carbide’s own endmills matched to the Nomad, so a new owner starts with sane numbers, but the real value accrues over time: every time the operator finds a feed and speed that cuts a particular material cleanly, they save it back to a custom tool entry, and the machine never forgets it. Building out a personal tool library keyed to the materials this shop actually cuts is the quiet difference between a machine that always needs babysitting and one that reliably makes good parts.
3.4 Carbide Motion: the sender
Carbide Motion is the program that actually talks to the machine. Underneath, the Nomad runs a GRBL-family motion controller — the widely used open motion firmware for hobby and desktop CNC — and Carbide Motion is the friendly front end to it over a USB connection. Its job is everything that happens once the G-code exists: connecting to the machine, homing it, jogging the axes to position, running the tool-length and BitZero probing routines, setting the work zero, loading the G-code file, and running it with a big obvious feed-hold and stop.
Two things make Carbide Motion pleasant on the Nomad specifically. First, the probing is baked into the interface as guided routines rather than raw G-code the operator has to type — press the button, follow the prompt, and the machine measures the tool or finds the corner. Second, the tool-change flow is handled: when a job calls for a new tool, the machine pauses and prompts, the operator swaps the collet’s tool, and Motion re-probes the new tool’s length automatically before resuming at the correct depth. That closed loop is what makes multi-tool jobs — rough with one cutter, finish with another — a routine thing rather than a nerve-wracking manual re-zero.
3.5 Feeds and speeds for aluminium on a desktop mill
Feeds and speeds are the two numbers that decide whether a cut succeeds: the speed is how fast the spindle turns (RPM), and the feed is how fast the tool moves through the material (mm/min or in/min). Get them wrong and the tool either rubs (making dust and heat) or overloads (chattering, deflecting, or snapping). Get them right and the tool peels clean chips and the part comes out with a good finish. On a light machine cutting metal, this is the skill that matters most, so it is worth understanding rather than just copying numbers.
The governing idea is chipload — the thickness of material each cutting edge shaves off per revolution. Every endmill wants its chipload in a certain range; too thin and the edge rubs and work-hardens the aluminium instead of cutting it, too thick and the cut overloads. The feed rate falls out of the arithmetic: feed equals RPM times the number of flutes times the chipload. That formula is the whole game.
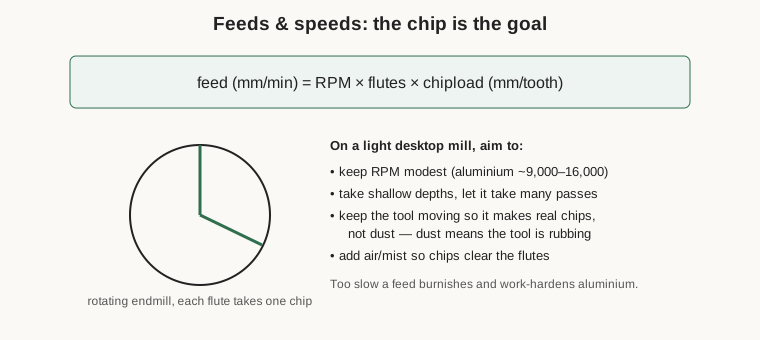
For aluminium on the Nomad, the practical strategy that follows from a light machine is:
- Keep the RPM moderate, not maxed. Aluminium wants a lower surface speed than wood; a small endmill in aluminium is typically run somewhere in the machine’s lower-to-middle range (well under the 24,000 RPM ceiling), which is exactly why the Nomad’s ability to run down near 9,000 RPM matters. Spinning too fast for the feed the machine can sustain is the classic cause of rubbing and a ruined finish.
- Take shallow depths of cut and let the machine make many passes. The Nomad’s 130 W spindle and light frame cannot hog, so the winning move is small bites, taken repeatedly and quickly, rather than one deep slow pass. Adaptive/high-efficiency toolpaths that keep the tool engagement light and constant are ideal on a machine like this.
- Keep the tool moving fast enough to actually make chips. The counter-intuitive beginner mistake is going too slow on the feed to “be safe” — which just rubs the edge, generates heat, and work-hardens the aluminium into a mess. Watch and listen: real chips and a steady cutting sound are the target; fine powder and a squeal mean the feed is too low or the RPM too high.
- Start from a proven recipe. Carbide publishes aluminium feeds-and-speeds recipes for the Nomad and its endmills, and the community forum is full of tested numbers for 6061 with 1/8-inch and smaller cutters. Start there, cut a test, adjust, and save the winning numbers back to the tool library.
None of these are exotic; they are just the discipline of matching a modest machine’s real capability rather than fighting it. Respect the shallow-and-steady rule and aluminium is routine.
3.6 Coolant, lubrication, and chip management
Milling aluminium generates heat and chips, and both need managing — especially inside a closed box. Aluminium’s particular vice is that hot chips can weld themselves to the cutting edge (built-up edge), which then tears the finish and can break the tool. The fix is not flood coolant on a desktop machine; it is air and mist. A simple air blast aimed at the cut clears chips out of the tool’s flutes so they are not re-cut, and a light mist of a suitable cutting lubricant (or even a periodic touch of a stick lubricant on the tool) keeps the edge from loading up. A little lubrication transforms aluminium finish and tool life; running bone dry is doable for light cuts but marginal.
Because the Nomad is enclosed, chip management is genuinely easier than on an open router — the chips have nowhere to go but the tray. The enclosure does mean a mist system needs to be modest and tidy, and the machine should be brushed and vacuumed out between jobs so chips do not pack around the axes. But the same box that contains the mess also makes it trivial to collect: open the door, vacuum the tray, wipe the rails, done. For dusty materials like wood, plastic, and PCB fiberglass, a shop vacuum at the enclosure keeps the internal air clear.
3.7 Workholding in practice
Software and feeds mean nothing if the workpiece moves, so every job begins with a workholding decision. The Nomad’s practical options, roughly from simplest to most robust, are shown below.
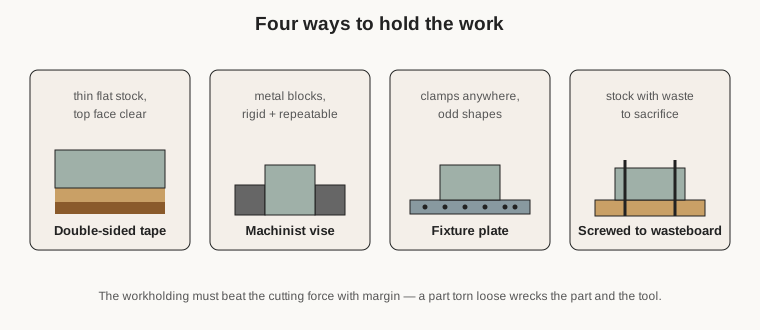
- Double-sided tape. For thin, flat stock — a plate, a PCB blank, a panel — a good carpet-grade double-sided tape holds astonishingly well and leaves the top face completely clear of clamps for the tool to roam. It is the go-to for sheet work and comes in the box.
- A machinist’s vise. A low-profile vise sized for the envelope grips a block of stock by its sides, holding it rigidly for aggressive cuts and making it easy to load part after part in the same position. This is the standard for milling aluminium blocks.
- A fixture / threaded plate with clamps. A grid of tapped holes lets the operator bolt down clamps, soft jaws, or custom fixtures anywhere, which is the flexible workhorse for odd shapes and repeat jobs.
- Screws into the wasteboard. For material that can take a few holes in its waste area, screwing straight down into the MDF wasteboard is fast and dead solid.
The recurring principle is that the workholding must beat the cutting forces with margin to spare, because the failure mode — a part torn loose mid-cut — wrecks the part and often the tool at once. On a small rigid machine with short parts, that is an achievable bar for every setup, provided the operator actually thinks about it each time rather than trusting to luck. With the stock held, the tools in the library, the feeds proven, and the zero probed, the machine does the rest — and Volume 4 turns all of this into a catalogue of real parts, a specs table, and a maintenance and reference guide.
Comments (0)