Shapeoko 3 XXL · Volume 6
Projects and Reference — What It Makes, the Numbers, and Keeping It Running
6.1 What the machine actually makes
A specification sheet says what a machine can do; the projects that come off it say what it is for. The Shapeoko 3 XXL, especially in the modified form this shop runs, has a clear centre of gravity, and it is worth being honest about both the sweet spot and the edges.
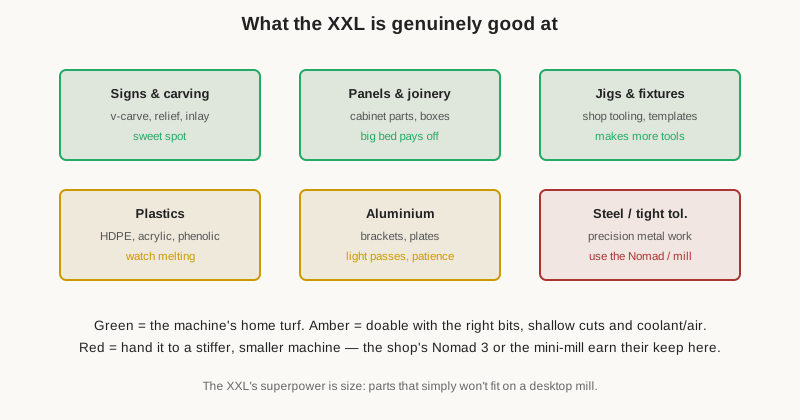
Signs and carved work are the machine’s home turf, and the large bed is a direct advantage. V-carved lettering, relief carvings, inlays, house numbers, decorative panels — anything that traces intricate paths while removing little material at a time — plays perfectly to a light, large router. The XXL will happily carve a sign that no desktop machine could hold in one piece, and the V-bit work that lettering depends on is exactly where the machine is happiest.
Panels and joinery are the second big category. Cabinet doors, box parts, drawer fronts, jointed panels, furniture components, and nested sheets of small parts all benefit from the 33-by-33-inch bed: work that would need tiling, flipping, or re-fixturing on a smaller machine fits in a single setup. Plywood, MDF, and solid wood are the machine’s natural diet, and the big envelope is precisely what a maker pays the XXL premium for.
Jigs, fixtures, and shop tooling are the third, and the most quietly useful. A CNC router is a tool that makes tools: drilling templates, routing guides, assembly fixtures, and holders for its own future work. Every fixture the machine cuts makes the next batch of parts faster and more repeatable, and this compounding usefulness is one of the best reasons to own a large-format machine.
At the edges, plastics — HDPE, acrylic, phenolic, machinable foam — cut well with attention to melting and chip clearance, and are excellent for enclosures, panels, gaskets, and prototypes. Aluminium is genuinely within reach for brackets, plates, spacers, and faceplates, using single-flute bits, shallow passes, a lubricant or air blast, and patience — real work comes off the machine, but it is work at the edge of the envelope rather than in the comfort zone. Steel and tight-tolerance metal work are past the edge for a router of this class; those jobs belong to a stiffer, smaller machine — the shop’s Nomad 3 or the mini-mill earn their keep exactly here, just as the XXL earns its keep on the large wood-and-plastic work they cannot hold. A shop with both ends of the spectrum covered rarely has to compromise a job to the wrong tool.
6.1.1 A sensible first few projects
For a machine this size, the most useful early projects are the ones that improve the machine itself. Surfacing the wasteboard is the true first job — it is required for accuracy, teaches the machine’s motion, and produces a flat reference that everything after it depends on. A set of custom hold-downs and clamps, cut from scrap, is a natural second: the machine makes the fixtures that make it more useful. From there, a simple engraved or V-carved sign exercises the toolchain end to end — design, toolpath, workhold, zero, cut — with forgiving material and low stakes, and produces something satisfying to show for it. These low-risk projects build the habits (workholding discipline, feeds-and-speeds intuition, tab placement) that harder jobs demand, and they do it while the cost of a mistake is a scrap of plywood rather than an expensive blank.
6.1.2 Quick symptom-to-cause reference
Most day-to-day problems on a Shapeoko trace to a short list of mechanical causes rather than to the software, and recognising the pattern saves a great deal of time.
Table 1 — Quick symptom-to-cause reference
| Symptom | Usual suspects |
|---|---|
| Cut is offset or “steps” mid-job | Lost steps: too aggressive a cut, loose belt, slipping pinion set screw, or a stall |
| Chatter marks, poor finish | Excessive depth/feed, loose V-wheel eccentrics, dull bit, or workpiece not held firmly |
| Burning wood / melted plastic | Chip load too low — feed too slow or RPM too high — or a dull bit |
| Ridges on a surfaced face | Spindle out of tram |
| Rectangle comes out as a parallelogram | Machine out of square (gantry/belt setup) |
| Z depth inconsistent / plunging deep | Soft or slipping Z (a stock belt-Z symptom the lead-screw conversion is meant to cure) |
| Homing fails at startup | Disconnected or dirty homing switch, or machine not clearing the switch on pull-off |
| Broken bit on a through-cut | Part shifted into the cutter — missing or too-small tabs, or workholding let go |
None of these is exotic, and each points at one of the adjustable joints or setup choices covered in these volumes. The discipline of reading a symptom back to its mechanical cause — rather than blaming the G-code — is most of what separates a frustrating machine from a reliable one.
6.2 Specifications summary
The following consolidates the verified figures used throughout these volumes. Where a value depends on configuration — most obviously the Z axis, which on this machine has been converted from the stock belt drive to a lead screw — both the stock figure and the modification are noted.
Table 2 — Specifications summary
| Parameter | Specification |
|---|---|
| Machine | Carbide 3D Shapeoko 3 XXL (open-frame CNC router) |
| Cutting area (X × Y) | ~33 × 33 in (~838 × 838 mm) |
| Z travel (stock) | ~3 in (~76 mm), belt-driven |
| Z axis (this machine) | Converted to a lead-screw-driven Z (owner’s build; details to come) |
| Overall footprint | ~44.75 in W × 40.25 in D × ~16 in H (electronics enclosure projects at left) |
| Weight | ~145 lb (assembled) |
| Frame | Bolted aluminium extrusion, on adjustable feet |
| Linear motion (stock) | Delrin V-wheels on machined extrusion edges, eccentric-nut preload |
| X / Y drive | GT2 toothed belts, 9 mm wide, stepper-pinion driven |
| Z drive (stock) | Belt-driven (narrower belt); converted to lead screw on this machine |
| Motors | NEMA 23 bipolar steppers, 1.8°/step (200 steps/rev); two Y, one X, one Z |
| Controller | Carbide Motion controller board |
| Firmware | GRBL (v1.1 on current machines) |
| Reference / homing | Homing switches (required); optional BitZero (work zero) and BitSetter (tool length) |
| Spindle / router | Trim router in a 65 mm mount — Carbide Compact Router (~12,000–30,000 RPM) or DeWalt DWP611 (~16,000–27,000 RPM) |
| Collets | 1/4 in and 1/8 in |
| Wasteboard | MDF, with parallel T-slot tracks (1/4 in T-bolts) for clamping |
| Stock CAD/CAM | Carbide Create |
| Stock sender | Carbide Motion |
| Sender (this machine) | CNCjs on a dedicated computer (owner’s build; details to come) |
| Materials | Wood, plywood, MDF, plastics; aluminium with care; not steel/hard metals |
A note on the numbers: these are drawn from Carbide 3D’s published specifications and documentation and from the well-established community record. Where a figure is approximate it is marked as such, because the honest state of a modified machine is that some values (Z travel, steps-per-millimetre, and the like) have been changed by the owner’s conversions and are properly documented as part of the owner’s build rather than assumed from the stock sheet.
6.3 Maintenance: the small routine that keeps it accurate
A Shapeoko does not demand much maintenance, but it repays it precisely, because most of its accuracy lives in a handful of adjustable joints. Neglect them and the machine slowly drifts in ways that look like software problems but are really mechanical ones. The routine is short.
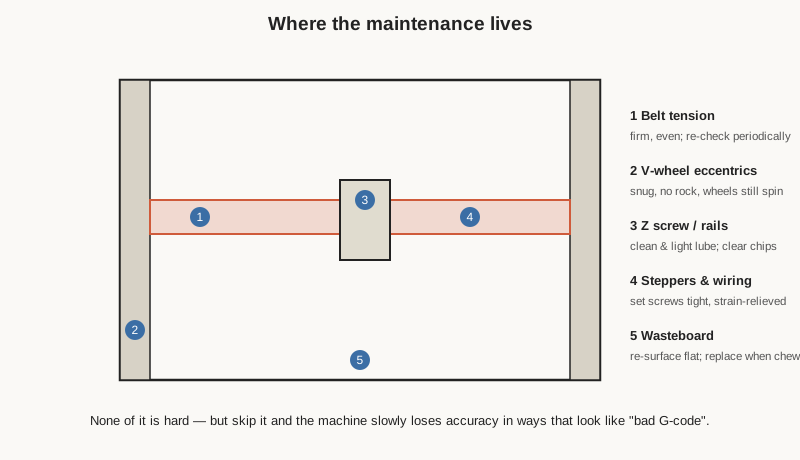
Belt tension heads the list on any belt-driven axis. The X and Y belts should be firm and even — tensioned enough that they do not stretch and add positional error under load, but not so tight that they strain the motor shafts. Tension is checked periodically and after any work that disturbs the belts, and a loose belt is one of the first things to suspect when accuracy wanders or the machine loses steps.
V-wheel eccentrics are next. The eccentric nuts that preload the V-wheels want to be snug — no perceptible rock in the carriage, but the wheels can still just be stopped from spinning by a fingertip as the carriage moves. They loosen over time and the wheels wear, so they are checked periodically; a rocking carriage puts play straight into every cut. Worn V-wheels are consumable and replaced when they no longer preload cleanly.
The Z screw and rails — on this machine’s lead-screw conversion — want to be kept clean and lightly lubricated per the hardware’s needs, and clear of the dust and chips that inevitably fall on them. A screw-and-rail Z is more robust than the belt it replaced, but it is also a precision component that dislikes grit; keeping it clean is the price of its accuracy. (On a stock belt Z, the equivalent item is simply the Z belt’s tension and condition.)
Steppers and wiring need little, but the little matters: the set screws on the motor pinions must stay tight (a slipping pinion mimics a lost-step fault and is maddening to diagnose), and the wiring should stay strain-relieved and clear of moving parts, because a router lives in a hostile environment of vibration and flying debris.
The wasteboard rounds out the list. It is resurfaced when it loses flatness or gets too chewed, and replaced when it is beyond skimming. Because the whole machine’s accuracy references the wasteboard’s flatness, keeping it true is not housekeeping but calibration.
Beyond this routine, the general hygiene of any CNC router applies: keep the rails and moving surfaces clean, keep dust out of the electronics, and address anything that starts to sound or feel different before it becomes a ruined part. A machine kept to this modest standard holds its accuracy for years.
6.4 A word on the modified machine’s maintenance
The modifications this machine carries change its maintenance profile in ways worth flagging, and which will be documented in full as the owner’s build is written up. The lead-screw Z removes the stock Z belt from the tension routine and adds a screw-and-rail cleaning-and-lubrication item in its place. The cabinet concentrates dust where it can be extracted but also encloses the electronics and computer, so ventilation and dust ingress into those become things to watch. And the CNCjs controller adds a small computer to the “keep it running” list — backups of its configuration and macros, and the usual care of any always-on machine. None of these is onerous, and each is the natural consequence of a modification that, on balance, makes the machine better. Details of this machine’s specific maintenance particulars are documented as part of the owner’s build.
6.5 Further reading and references
The Shapeoko is one of the best-documented hobby CNC machines in existence, and a maker is never far from an answer. The most useful starting points:
- Carbide 3D (carbide3d.com) — the manufacturer. The product pages, the Shapeoko manuals and assembly guides, and the Carbide 3D help/guides site are the authoritative source for specifications, assembly, and the stock software (Carbide Create and Carbide Motion). This is the reference these volumes were checked against.
- The Carbide 3D community forum (community.carbide3d.com) — an active, searchable forum where owners document builds, modifications, problems, and fixes. For any specific question about the machine or its upgrades, this is usually where the answer already lives.
- The Shapeoko wiki (wiki.shapeoko.com) and the community “Shapeoko CNC A to Z” documentation — deep, independent references on the machine’s anatomy, parts, upgrades, and operation, carrying forward the platform’s long open-source tradition.
- GRBL — the firmware’s own documentation, for anyone configuring the controller, recalculating steps-per-millimetre after a mechanical change, or decoding an alarm code.
- CNCjs (cnc.js.org and its GitHub project) — the documentation and user guide for the browser-based sender this machine uses, covering installation on a Raspberry Pi or PC, the widget and macro system, and networked control.
- Feeds-and-speeds resources — Carbide’s own published starting numbers, plus the broader community’s charts and calculators, for turning a bit and a material into a safe starting point.
For the mechanical upgrades in particular, it is worth studying Carbide’s own Z-Plus and HDZ products and their documentation even if building a custom Z, because they are the reference implementations of exactly the belt-to-screw conversion this machine underwent, and they encode a great deal of thinking about how such a conversion should be done.
6.6 Closing
The Shapeoko 3 XXL is a machine that knows what it is: a large, open-frame, belt-driven CNC router that trades absolute rigidity for a big, affordable, endlessly modifiable work envelope, and that excels at exactly the wood, plastic, and sign work such a machine is built for. Its weak points — a frame that wants to be kept flat, a belt Z that is the softest link, and stock control that ties up a laptop — are all well understood, and all of them are precisely the ones this shop’s owner has addressed, with a custom cabinet, a lead-screw Z, and a dedicated CNCjs controller. The result is a thoroughly-understood platform brought out to the edge of what it can comfortably become. As the owner’s specific build is documented — the cabinet, the Z hardware, the controller, and the maintenance and configuration that go with them — the clearly-marked slots in these volumes will fill in, turning a thorough account of the base machine into a complete account of this particular, well-loved one.
Comments (0)