HiTorque 7×16 Mini Lathe · Volume 5
Projects & Reference — What It Makes, Full Specifications, and Further Reading
5.1 What the machine is for
A tool is best understood through the work it does, and the mini lathe’s work is small, round, and precise. This closing volume surveys the kinds of parts a 7×16 turns out in a model shop, gathers the machine’s full published specifications into one reference table, summarizes the maintenance that keeps it accurate, and points to the community and vendor resources that make the mini lathe one of the best-documented machines a maker can own. As throughout this deep dive, every quoted specification is LittleMachineShop’s figure for the model 7450; community techniques are cited to their sources at the end.
5.2 Representative parts a mini lathe makes
The everyday output of a mini lathe is the population of small turned parts that hold machines and models together. None of them is glamorous individually, but a shop that can make them on demand is a shop that is not waiting on a supplier for a part that does not exist off the shelf.
Bushings and bearing sleeves are perhaps the most common. A bushing is a plain bearing: a cylinder, bored to slip over a shaft and turned to press into a housing, often with a shoulder or flange. Making one exercises the whole machine — face the stock, drill and bore the inner diameter to fit the shaft, turn the outer diameter to fit the housing, and part off — and it is the archetypal mini-lathe job. Bronze, brass, and engineering plastics are the usual materials.
Shafts, pins, and axles are the complementary parts: round stock turned to precise diameters, often with several stepped diameters (a bearing journal here, a shoulder there, a threaded end), sometimes reduced along most of their length. The 7×16’s long-for-the-class bed is exactly what makes slender shafts practical, since the tailstock can support the free end against tool pressure. Dowel pins, drive shafts, and pivot pins all come off the machine this way.
Spacers, standoffs, and collars are simple turned rings and cylinders bored to a bolt or shaft size and faced to a precise length — the small parts that set a gap, mount a board, or locate a component. They are quick work and endlessly needed.
Threaded parts — studs, adapters, custom bolts, knobs with threaded stems, and internally-threaded bosses — draw on the machine’s screw-cutting capability when a needed thread is an odd size or a special length that no fastener supplier stocks. An adapter that converts one thread to another, cut on the lathe, is a frequent save.
Knobs, handles, and hardware show the machine’s decorative side: a knurled knob turned from bar, a ball handle, a custom fastener finished to look right. These bring in knurling (rolling a textured pattern into the surface) and forming, and they are the parts that make a shop-built machine look finished rather than improvised.
Model and mechanism parts are the reason many makers buy the machine at all: pistons, cylinders, flywheels, glands, valve parts, and fittings for model engines; custom parts for the shop’s own machines; and the one-off metal components that a 3D printer cannot make in metal to tolerance. This is precisely the model-shop use case for which the 7×16 is well suited — small, accurate, varied, one-off metal work.
The through-bored spindle deserves a mention in this context, because it changes how repetitive small parts are made. With the 0.787-inch (20 mm) bore, a length of bar can be passed through the headstock and fed forward as each part is finished and parted off — so a run of a dozen bushings or spacers is made from one bar without re-chucking each blank, a real convenience for the small-batch work a model shop often needs.
5.3 A worked example: making a bushing
It is worth walking one complete part from bar to finished piece, because doing so shows how the operations described in the earlier volumes chain together into real work. Consider a common job: a flanged bronze bushing, bored to press over a 3/8-inch shaft, turned to press into a 5/8-inch housing, with a small flange at one end and a finished length of half an inch.
The work begins with a length of bronze bar held in the three-jaw chuck, projecting a little beyond the jaws. The first cut faces the end flat and square — a light facing pass across the projecting end establishes a clean reference face and squares up the sawn end of the bar. Next the operator center-drills the face from the tailstock to start an accurate hole, then follows with a twist drill in a tailstock drill chuck, opening the hole to a little under the finished bore and pecking to clear chips. With a drilled hole established, a boring bar takes over to enlarge and finish the inner diameter to a precise slip fit over the 3/8-inch shaft, working outward in light passes and creeping up on the dimension with the cross-slide dial or DRO, since a bore is easy to cut oversize and impossible to put back.
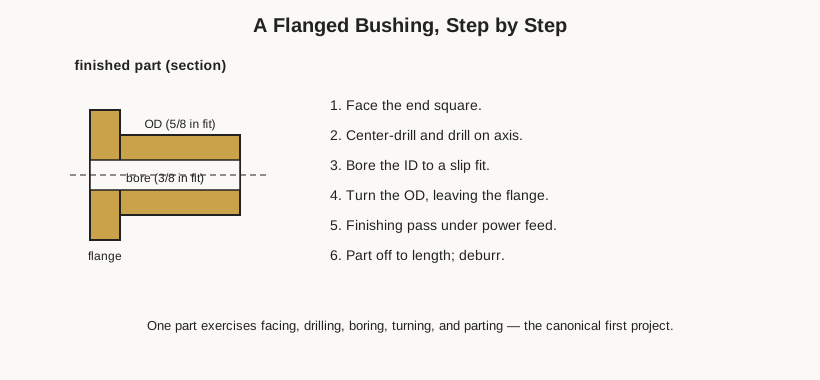
With the inside done, attention turns to the outside. The operator turns the outer diameter down to the housing fit over most of the projecting length, leaving a short section at the chuck end at full diameter to become the flange, then takes a fine finishing pass under power feed for a good surface. A quick check with a micrometer confirms both diameters. Finally the parting tool severs the bushing from the bar at the finished overall length, the flange left intact at what is now the back of the part. The bushing is faced to final length if needed, deburred, and it is done — a single part that exercised facing, center-drilling, drilling, boring, turning, and parting, which is why the humble bushing is the canonical first project and the standard by which a new machine is judged. The same sequence, elaborated, makes almost every stepped, bored part a model shop needs.
5.4 Tooling to buy first
A recurring question from anyone acquiring a machine like this is what to buy alongside it, and the community’s answer has settled into a fairly consistent priority. Because the 7450 already ships with the quick-change tool post, five holders, a three-jaw chuck, and a dead center, the first additions are usually a live center for the tailstock (so long work can be supported at speed), a drill chuck on an MT2 arbor and a set of center drills and twist drills (to make the machine a drilling station), and a small selection of cutting tools — a set of indexable carbide turning, facing, and boring tools plus a few HSS blanks and a parting blade. Close behind come a four-jaw independent chuck for accurate and non-round work, a set of measuring tools (a good caliper and a micrometer, since a lathe can only be as accurate as what measures its output), and cutting fluid appropriate to the metals worked. Beyond that the list grows with the work: collets for small precise stock, a steady rest for slender parts, extra QCTP holders so more tools live pre-set, and additional change gears to widen the thread range. The general rule, learned by every mini-lathe owner, is to budget roughly as much again for tooling and measuring equipment as for the machine itself over the first year.
5.5 Full specifications (LMS model 7450)
The following table gathers LittleMachineShop’s published specifications for the HiTorque 7×16 Deluxe Mini Lathe, model 7450 (SC20). These are the figures cited throughout this deep dive.
Table 1 — Full specifications (LMS model 7450)
| Specification | Value |
|---|---|
| Model | HiTorque 7×16 Deluxe Mini Lathe, LMS 7450 (SC20) |
| Swing over bed | 7.087 in (180 mm) |
| Distance between centers | 16.142 in (410 mm) |
| Swing over cross slide | 2.165 in (55 mm) |
| Cross-slide travel | 2.559 in (65 mm) |
| Spindle through-bore | 0.787 in (20 mm) |
| Spindle taper | No. 3 Morse taper (MT3) |
| Spindle bearings | NSK (Japanese) |
| Motor | 500 W brushless DC spindle-drive motor, belt drive |
| Spindle speed | 100–2500 RPM, continuously variable, both directions, no gears |
| Lead screw | Reversible, 16 TPI; real top and bottom half-nuts |
| Threading capability | 4–80 TPI; 0.3–8.0 mm |
| Change gears | 11-gear set (21-tooth gear included for metric) |
| Tailstock taper | No. 2 Morse taper (MT2); MT2 dead center included |
| Chuck | 4 in (100 mm) 3-jaw self-centering (Sanou) |
| Tool post | 0XA wedge-type quick-change, five holders; accepts up to 1/2 in shank |
| DRO | 2-axis (longitudinal + cross) magnetic scales, Bluetooth to tablet; readouts on compound and tailstock; 40-division cross-slide dial |
| Control panel | LED “mirror” display: illuminated start/stop, direction, E-stop, variable-speed knob, RPM tachometer |
| Hand-wheels / levers | Aluminum hand-wheels, chrome levers |
| Power | 120 V, 60 Hz, 8 A |
| Weight | 108 lb (49 kg) |
A word on distinguishing this machine from its siblings, since the numbers alone do not: the 7450 is the Deluxe / mirror-display trim of the 7×16. The base 5100 gives the same brushless drive and long bed without the mirror panel, quick-change post, or factory DRO; the 7350 adds the quick-change post and a cross-slide digital readout but not the full mirror display and Bluetooth tablet DRO of the 7450. All three are genuinely 7×16 machines and share tooling; the difference is entirely in the control, display, and workholding package. And all of them are a step above the generic brushed, geared 7×12/7×14 mini lathes they resemble — the brushless drive, the longer bed, and (on this trim) the integrated DRO are the substantive differences a buyer is paying for.
5.6 Limitations, and when to reach for another machine
Understanding a tool includes knowing its edges. The 7×16 is a capable bench lathe, but it is a bench lathe, and its limits are set by mass and rigidity rather than by the motor. It cannot take the deep, heavy roughing cuts a floor-standing engine lathe shrugs off; work is removed in more, lighter passes, and very hard or very tough materials push against the machine’s stiffness even in light cuts. Its capacity is bounded by the roughly 7-inch swing and 16 inches between centers — larger or longer work simply will not fit — and by the four-inch chuck’s grip. The DRO and quick-change tooling make it fast and repeatable for one-off and small-batch work, but it is not a production machine and not a CNC lathe; every cut is hand-controlled. And a lathe makes surfaces of revolution: work that is fundamentally prismatic — flats, slots, pockets, gears — belongs on the mill, not the lathe, though the two machines complement each other so naturally that most shops that have one soon acquire the other. Knowing these boundaries is not a criticism of the machine; it is what lets an operator choose the right tool for a job and get the best from the lathe within the envelope where it excels: small, accurate, round, varied metal parts.
5.7 Maintenance summary
Keeping the machine accurate is a matter of small, regular attention rather than major service. Before each session, wipe a light film of way oil onto the bed ways and slides and confirm nothing is fouling the carriage’s travel; after each session, brush off all chips — never drag them along the ways — and wipe up any cutting fluid. Oil the lead screw, feed screws, and their nuts at their oilers periodically. Re-check the gib adjustments on the cross-slide, compound, and saddle from time to time, since they loosen slightly as the machine wears in, and confirm the tailstock alignment if turned parts start showing an unexpected taper. The sealed spindle bearings need no routine service. Keep the change gears and their quadrant clean and lightly oiled, and store tooling — chucks, centers, the QCTP holders — protected from rust. Done as a habit, this handful of tasks keeps a mini lathe cutting like a good one for many years; neglected, the same machine turns tapers, chatters, and rusts. The tuning volume covers each of these adjustments in detail.
5.8 Links and further reading
One of the strongest reasons to own a mini lathe is that it is among the best-documented machines a hobbyist can buy. Three kinds of resource are worth knowing.
The vendor. LittleMachineShop is the machine’s seller and the authoritative source for its specifications, its user’s guide (a downloadable PDF), replacement parts, and the deep catalog of accessories built specifically to fit the 7×16 — chucks, collets, steady rests, tool holders, change gears, and consumables. Their product pages and comparison tools are the reference for the differences between the 5100, 7350, and 7450 trims, and their support and parts availability are a real part of the machine’s value.
The community reference sites. The independent site mini-lathe.com is the long-standing encyclopedia of these machines, with detailed, illustrated guides to tuning, gib and backlash adjustment, tailstock alignment, and threading that apply almost verbatim to this machine despite predating it. Sites like Gadget Builder and various long-running personal machining blogs document alignment procedures, modifications, and projects in depth.
The forums. The Hobby-Machinist forum, the Home Model Engine Machinist forum, and the Home Shop Machinist bulletin board are active communities where mini-lathe owners troubleshoot, share modifications (better gibs, tailstock mods, lead-screw oilers, DRO installs), and post projects. Because so many people run mechanically-similar machines, almost any question about setup, tooling, or technique has already been answered there in detail. For a maker learning the machine, these three resources together — the vendor for facts and parts, the reference sites for procedure, and the forums for the accumulated experience of thousands of owners — mean that no problem encountered on the 7×16 is one that has to be solved alone.
Sources for the community techniques and the machine’s specifications are recorded in this volume’s photo and source credits.
Comments (0)