LONGER RAY5 10W · Volume 4
Materials, safety, and reference for the RAY5 10 W
4.1 The materials map
Everything a diode laser can and cannot do follows from one fact established in the first volume: a laser only works on material that absorbs its wavelength, and the RAY5’s wavelength is blue, about 445 to 450 nm. Blue light is eagerly absorbed by dark, matte, organic surfaces and poorly absorbed by things that are clear or shiny to blue. That single rule sorts the whole material world into three buckets — things the laser engraves and can cut, things it can only mark, and things it should not be pointed at — and knowing which bucket a material falls in before firing the laser saves both ruined work and genuine hazards.
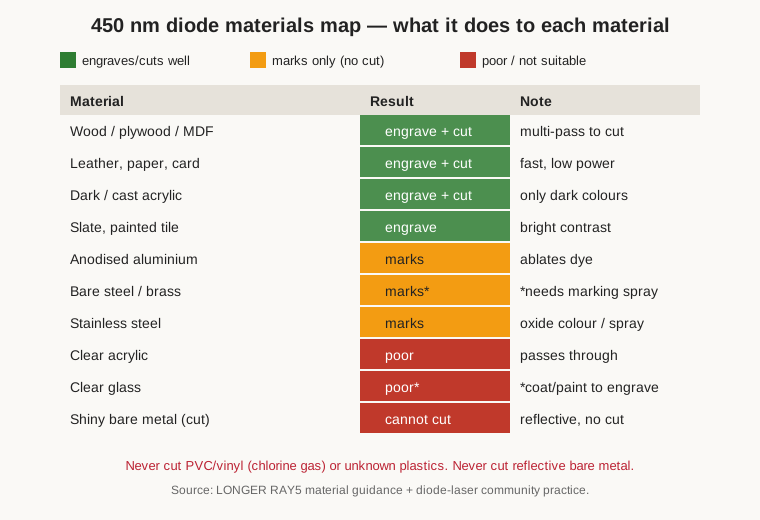
The strong performers are the organics. Wood — solid hardwood, plywood, MDF, veneer — engraves beautifully, taking clean tonal detail, and the 10 W module will cut thin stock in multiple passes. Leather and paper and card engrave fast at low power and cut easily. Cork, bamboo, cardboard, and most natural fibres behave similarly. Among plastics the important qualifier is colour: dark or opaque acrylic engraves and cuts well because it absorbs blue, whereas clear acrylic does not (see below). Painted or coated surfaces are excellent subjects — the laser ablates the coating to reveal the substrate, which is the mechanism behind engraving on slate, on painted tile, and on powder-coated metal, all of which give bright, high-contrast results.
The second bucket is metals, and here the diode does something the shop’s CO2 laser cannot: it marks metal, even though it cannot cut it. Anodized aluminium marks cleanly because the beam ablates the coloured anodizing layer to expose bright metal beneath — crisp light-on-dark text and logos with no chemistry required. Bare steel, stainless, and brass absorb enough blue to be marked, but usually only with help: a metal-marking compound or spray (the familiar products are a black paint-like coating such as Cermark or the cheaper dry-moly and even plain flat-black spray paint) is applied to the surface, the laser fuses it permanently to the metal in the shape of the design, and the unfused excess is washed off, leaving a durable black mark. Stainless can additionally be marked directly by heat-tinting its surface to a range of oxide colours at lower power. None of this is cutting — the diode removes no appreciable metal — but for serial-numbering tools, marking parts, and decorating steel tumblers it is a real capability that justifies keeping a blue laser in a shop that already owns a CO2.
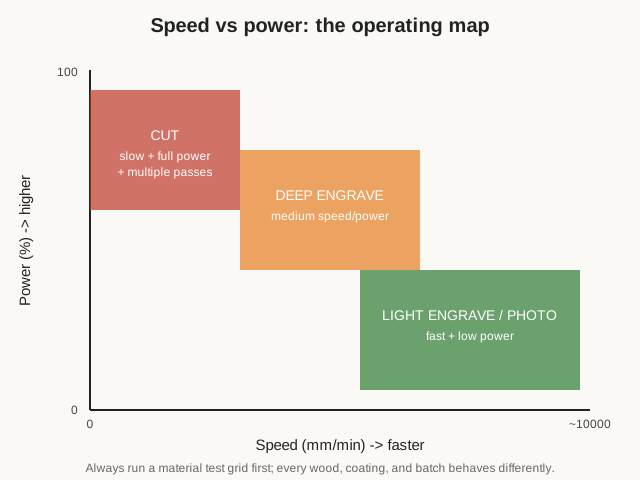
Knowing which bucket a material sits in is only half the job; the other half is choosing how hard and how fast to drive the beam, and that trade is best pictured as a map. Slow travel at high power concentrates energy and cuts or engraves deep; fast travel at low power barely marks. Every result the machine can produce lives somewhere on that speed-versus-power plane, and the practical way to find the right spot is not to read a number off a chart but to burn a small test grid on the actual material, as the workflow volume describes.
The third bucket is what the RAY5 handles poorly or not at all, and part of it is a safety matter, not merely a capability one. Clear acrylic and clear glass transmit blue light rather than absorbing it, so the beam passes through with little effect; the workaround for glass is to coat it — paint, or even a wet sheet of paper or a coat of dish soap on the surface — giving the beam something to bite so it can frost the glass beneath. Shiny bare metal cannot be cut and reflects the beam, which is both useless and a reflection hazard. And two materials must simply never be lasered: PVC and vinyl, which release corrosive, toxic chlorine gas that ruins the machine and endangers the operator, and any unknown plastic or foam, which may do the same. When in doubt about a plastic, the rule is not to cut it.
4.2 Laser safety — treating a Class 4 machine seriously
The RAY5 is an open-frame Class 4 laser, and that classification is not bureaucratic decoration. Class 4 is the most hazardous category in the laser-safety scheme: the beam can cause immediate and permanent eye injury, it will burn skin, it can ignite materials, and — the point that catches people out — even diffuse reflections, the scatter off a matte or shiny workpiece, can be intense enough to damage vision. On an enclosed laser a closed opaque lid contains all of this. The RAY5 has no lid, so the containment is entirely the operator’s job, and it rests on a few non-negotiable disciplines.
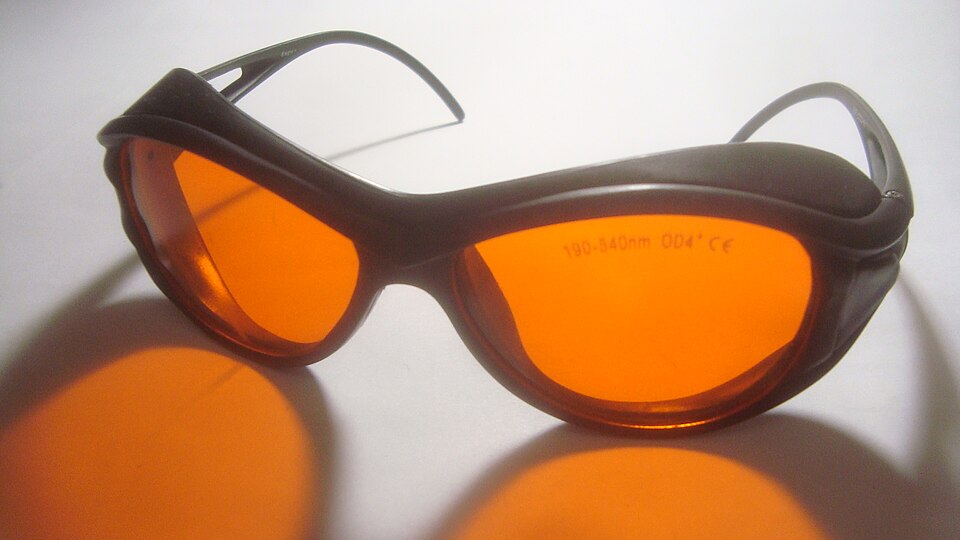
Eye protection comes first. Anyone in the room while the laser can fire wears laser safety glasses rated for the diode’s wavelength around 445 to 450 nm, with an optical-density (OD) rating specified for that blue band — OD in the range of 4 or higher at 450 nm is typical for this class of work. This is a specific technical requirement, not a suggestion to “wear something tinted.” Ordinary sunglasses, tinted safety glasses, welding shades, and orange 3D-printer-resin glasses are not laser eyewear and can be worse than nothing by encouraging a false sense of safety; only glasses certified to attenuate the actual laser wavelength count. The RAY5 ships with a pair, and everyone present should have their own. The cardinal rule that no glasses excuse: never look directly into the beam or its bright reflection, and never watch a running job with the naked eye — the intense blue glow an open diode laser throws off is precisely the light the glasses exist to block.
Fire is the second hazard, and it is not hypothetical. The laser is deliberately burning flammable material; a stall, a knot in wood, an oily surface, or simply a very slow cut can flare into open flame. The discipline is absolute: never leave the machine running unattended. An open-frame laser cutting wood or paper has nothing around it to contain a fire, so a person with a hand near the power switch, a fire extinguisher or a bucket of water or sand within reach, and eyes on the job is the whole safety system. Clearing scrap and dust out of the work area before a job removes tinder, and letting cut edges cool before handling avoids burns.
Fumes are the third hazard. Every engrave and cut vaporizes material into smoke that is at best irritating and at worst genuinely toxic, and the open frame contains none of it. The machine must be run with ventilation — ducted to the outdoors through a hood or enclosure, or through a proper fume extractor with the right filtration — and never in an unventilated room. This is also the strongest of several reasons never to laser PVC, vinyl, or unknown plastics, whose fumes can be corrosive and poisonous. Skin rounds out the list: the focused beam will burn flesh instantly, so hands stay clear of the head while it is armed.
Ventilation and an enclosure deserve their own thought, because the open frame leaves both entirely to the owner. The simplest effective arrangement is an enclosure — a purpose-built laser box, a modified cabinet, or even a tent of laser-blocking fabric — placed over the whole machine, with a duct leading from the enclosure to a window or an inline blower that pushes the fumes outdoors. The enclosure does double duty: it contains stray blue light so the room is safe to occupy without glasses when the lid is down, and it captures smoke at the source so the duct can carry it away. Where venting outdoors is impossible, a dedicated fume extractor with an activated-carbon and particulate filter is the fallback, though filters are consumables that must be replaced on schedule to keep working. What does not count as ventilation is an open window and hope; laser smoke is fine, sooty, and often toxic, and it must be actively moved away from the operator and the machine. Building or buying an enclosure is the single upgrade that most changes how pleasant and how safe an open-frame diode laser is to live with, and for a machine that will see regular use it should be considered essential rather than optional.
Electrical and general shop safety round out the picture. The machine runs from a mains-fed 12 V supply; keep that supply and its wiring away from the water and sprays used for glass and metal marking, and unplug the machine when working on the module or wiring. Tie back long hair and loose sleeves around the moving gantry, and keep the work area free of the solvents and finishing rags that accumulate in a busy shop, since they are exactly the fuel a stray flame wants.
A short pre-flight ritual makes all of this routine rather than burdensome: glasses on, workpiece secured and focus set, area clear of clutter and flammables, ventilation running, extinguisher within reach, frame the job at low power, then arm and start — and stay with the machine until it stops. A matching shutdown habit closes the loop: confirm the beam is off and the head has stopped, let the module fan run a little longer to cool the diodes, switch off and unplug if the machine is done for the session, and vent the enclosure clear of residual smoke before opening it.
4.3 Specifications summary
The following figures are drawn from LONGER’s published specifications for the RAY5 10 W. Optical power is the light output at the lens; wall/input power is separate and higher.
Table 1 — Specifications summary
| Parameter | Specification |
|---|---|
| Machine type | Open-frame diode laser engraver / light cutter |
| Laser wavelength | ~445–450 nm (blue) |
| Optical output power | ~10 W (LONGER quotes a 10–11 W measured range; two combined diodes) |
| Laser spot size | ~0.06 × 0.06 mm |
| Focus | Fixed focus, ~50 mm focal length (set by nozzle-to-work air gap) |
| Working area | 400 × 400 mm (15.75 × 15.75 in) |
| Z / module height range | Up to ~47 mm |
| Max travel speed | ~10,000 mm/min |
| Positioning resolution | ~0.01 mm |
| Controller | 32-bit, ESP32-based (240 MHz), GRBL firmware |
| Display | 3.5-inch colour touchscreen |
| Connectivity / control | USB tether, Wi-Fi / app, offline microSD (TF) card |
| Software | LaserGRBL, LightBurn (GRBL) |
| Air assist | Supported (external pump, sold separately) |
| Homing / limits | Limit switches with homing |
| Power input | AC 110–240 V |
| Power output (supply) | DC 12 V, 5 A (~60 W total); module ~12 V × 3.2 A (~38 W) |
| Assembled dimensions | ~586 × 583 × 176.5 mm |
| Weight (package) | ~4.8 kg |
| Rated cutting capacity | Up to ~20 mm basswood / ~30 mm acrylic (many passes) |
| Rotary option | LONGER Roller (Y-axis rotary, adjustable diameter to ~200 mm) |
4.4 Consumables, maintenance, and care
A diode laser has fewer consumables than a CO2 machine — no gas tube to age out on a fixed timescale, no water loop to maintain — but it is not maintenance-free. The laser diodes themselves are the principal wear item: they dim slowly over thousands of hours of use, and heat accelerates that decline, which is why the module’s cooling fan must always run and the module should be allowed to cool before power-down. When a well-used module no longer reaches its old cutting depth despite correct focus, an aging diode is a likely cause, and the module is replaceable — indeed the whole RAY5 module family is interchangeable, so a tired 10 W head can be swapped for a new one or upgraded.
The lens is the item that most affects daily results. Smoke and vaporized resin deposit a film on the lower optic that steals power and softens focus; a lens wiped clean with isopropyl alcohol and a lens tissue, gently and only when cool, often restores a machine that seemed to be weakening. Air assist dramatically slows this fouling by keeping smoke out of the beam, which is one more argument for fitting it. The mechanical system wants the usual belt-driven-machine attention: check and correct belt tension periodically (a slack belt causes backlash and ghosting), keep the linear rails or wheels clean and lightly lubricated per LONGER’s guidance, and clear accumulated dust and debris from the frame and especially from around any electronics. Keeping the work area clean is as much a safety measure as a maintenance one, since dust and offcuts are fuel. Finally, the fan and any air-assist pump should be kept clear of dust so cooling and airflow stay effective.
4.5 Further reading and references
The authoritative source for this machine is LONGER itself: the RAY5 10 W product page and user manual, the 10 W laser-module page, the company’s own comparison of the 5 W, 10 W, and 20 W modules (which explains the combined-diode design behind the “10 W optical” rating), and the Rotary Roller product page and quick-start guide. For the software and, in particular, for correct rotary configuration, the LightBurn documentation is the reference of record — its rotary-setup pages explain steps-per-revolution, object diameter and circumference, and the roller calibration procedure, and its material-test and image-mode features are the practical tools for finding settings. The broader diode-laser maker community — forums, the LightBurn community, and the large body of published material-setting charts — is invaluable for starting points, but the standing advice of this volume overrides any chart: run a material test on the actual stock, because every wood, coating, and metal spray behaves a little differently, and the ten minutes a test grid costs is the cheapest insurance the machine offers.
Sources: LONGER (longer3d.com) RAY5 10 W product page, user manual, 10 W laser-module page, RAY5 5W/10W/20W comparison, and Rotary Roller product and quick-start pages; LightBurn documentation (rotary setup and image modes).
Comments (0)